

Introduction to Stone Effect
Mithila paints, hailing from the culturally rich Mithila region of northern India, hold a significant place in the annals of traditional Indian art. Dating back to ancient times, these paints are primarily associated with Mithila paints, a style that is lauded for its intricate patterns and profound symbolism. The history of Mithila paints is deeply intertwined with the cultural landscape of the area, where art and daily life uniquely converge.
Traditionally, Mithila paints have been employed in the creation of Mithila paints, which adorns the walls of homes during festivals, weddings, and other auspicious occasions. This artistic tradition is predominantly carried out by women, passing down their skills through generations as part of their cultural legacy. Beyond mere decoration, Mithila paints art serves as a medium to express religious and mythological stories, social themes, and personal tales, imbuing the art with layers of meaning and purpose.
The making of Mithila paints is an art in itself, steeped in natural processes and sustainability. These paints are crafted from natural ingredients like cow dung, rice paste, plant extracts, and various minerals, ensuring an eco-friendly composition. The use of cow dung and rice paste as a base, combined with natural dyes derived from elements such as turmeric, saffron, indigo, and sandalwood, results in a vibrant palette that is both beautiful and environmentally considerate.
The natural origin of Mithila paints does not only underscore their environmental sustainability but also their durability and unique texture, which contribute to the distinctive stone effect they can emulate. In essence, the cultural and historical tapestry of Mithila paints extends beyond their aesthetic allure, offering a glimpse into the rich artistic traditions of the Mithila region and their capacity to produce enduring, meaningful art.
Materials Needed for Stone Effect
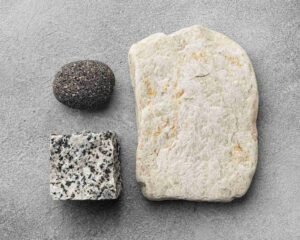
Creating a convincing stone effect with Mithila paints requires a thoughtful selection of materials. Primarily, Mithila paints in various shades are essential. Traditional Mithila paints are water-based and derived from natural ingredients, with a rich color palette typically including earthy tones such as ochres, greys, and browns. For achieving a stone effect, one can opt for paints with a matte finish as they closely replicate the natural texture of stones.
Brush variety is another crucial aspect. Flat and round brushes in different sizes will serve different purposes. Flat brushes are ideal for covering large areas, while round brushes are better for detailed work like creating stone grains and patterns. Beyond conventional brushes, tools like sponges and texture pads can be used to add a realistic stone texture. Sponges, especially, are excellent for blotting and creating a rugged surface pattern, which mimics natural stone variations effectively.
Surface selection is fundamental to the success of the stone effect. Wood, canvas, and thick paper are well-suited for this technique as they provide sufficient grip and texture for the paint to adhere well. Smooth surfaces might require pre-treatment like sanding or applying a primer to enhance the adhesion and durability of the paint. For those seeking modern alternatives, synthetic paper available in art stores can also be used; it mimics traditional surfaces with added durability and ease of handling.
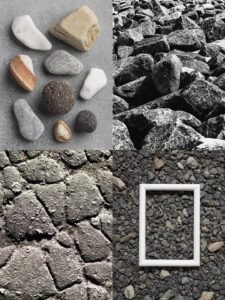
Incorporating additional materials like fine sand, crushed eggshells, or mica powder can enhance the stone-like texture. Sand can be mixed with the paint, while crushed eggshells and mica powder can be sprinkled when the paint is wet to give a gritty, reflective element. Modern alternatives to these traditional add-ons include texture gels available in art supply stores, which can save time and effort while still providing a similar effect.
Preparing Your Surface
To achieve a compelling stone effect with Mithila paints, surface preparation is paramount. The first step in this process is to ensure that the surface is clean and free from any debris. Begin by wiping the surface with a damp cloth to remove dust, dirt, and grime. For more stubborn stains, using a mild soap solution can be beneficial. Once the surface is visibly clean, let it air dry completely before proceeding to the next step.
Sanding the surface is an essential process to create a texture that can hold the paint effectively. Use fine-grit sandpaper to gently sand the area, focusing on creating a smooth yet slightly rough texture. Sanding helps in removing any blemishes or uneven spots that could interfere with paint application. After sanding, wipe the surface again to remove any dust produced during the sanding process.
Priming the surface is a critical step that should not be overlooked. A good-quality primer not only seals the surface but also creates an optimal base for the paint to adhere to. Choose a primer that is compatible with the material of your surface—whether it be canvas, wooden panels, or walls. Apply the primer evenly using a brush or roller and let it dry thoroughly according to the manufacturer’s instructions. This foundational layer will significantly enhance the longevity and overall appearance of the stone effect.
When selecting the type of surface for the stone effect using Mithila paints, certain materials work better than others. Canvas is an excellent choice for smaller art pieces due to its lightweight and versatile nature. Wooden panels offer a sturdy and durable option, ideal for longer-lasting projects. Walls, particularly those with a slight texture, can also hold the stone effect well, making them suitable for large-scale artistic endeavors.
In summary, the key to a successful stone effect lies in meticulous surface preparation. Cleaning, sanding, and priming are crucial steps that set the stage for the application of Mithila paints. Choosing the right surface—be it canvas, wood, or walls—further ensures that the stone effect will be both striking and enduring.
Mixing Mithila Paints for Texturing
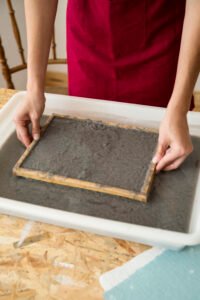
Achieving a stone effect using Mithila paints requires a precise mixture to create the desired texture. Begin by gathering your materials: you’ll need base colors, texture additives, water, and tools for mixing. The foundation of a convincing stone texture lies in the accurate proportioning of these ingredients.
The base color typically serves as the primary hue of the stone. For a basic mixture, start with one part Mithila paint base color and slowly add water until the mix reaches a smooth, creamy consistency. The water should be added incrementally and stirred thoroughly to avoid lumps. A good working ratio for the base mix is about three parts paint to one part water. This forms the undercoat that will anchor the stone effect.
For texture, incorporate special additives, such as sand, stone powder, or acrylic mediums. The amount will vary depending on the desired stone type. For rough stone, mix one part texture additive into five parts of your initial paint mix. For a smoother appearance, reduce the additive to one part in eight parts paint mix. More coarse additives should be used in smaller quantities to prevent the paint from becoming too thick to apply.
Stir the mixture thoroughly, ensuring that the texture additive spreads evenly throughout the paint. This will aid in achieving a consistent finish when applied. Test the mixture on a small surface area. Apply a thin layer and allow it to dry; this will give you an idea of the final appearance. If the texture appears too soft or not defined enough, adjust by adding a bit more texture additive. Conversely, if the mixture is too gritty, add a bit more of the base paint to balance it out.
Additionally, various stone types—granite, marble, or sandstone, for example—necessitate slight modifications in approach. For a more polished stone look, more water can be added to create a smoother layer, while raw, natural stones benefit from a higher concentration of texture additives. Practice on sample surfaces for the perfect finish.
Proper mixing techniques and patience are crucial to mastering the art of Mithila paints for stone effects. By adjusting ratios and thoroughly testing mixtures, one can create a myriad of stone textures, adding unique aesthetic value to art and décor projects.
Applying the Base Layer
Applying the base layer is a crucial step in creating a realistic stone effect with Mithila paints. The initial foundation layer sets the tone for the entire painting process, ensuring that the final result achieves the desired stone-like appearance. The following steps will guide you through the process, emphasizing techniques for creating an even coat and offering tips to avoid common pitfalls.
Start by preparing your surface. Ensure it is clean, dry, and smooth, as any imperfections can affect the outcome. Once the surface is prepped, choose a suitable base color from the Mithila paint range. Typically, neutral tones such as grays, beige, or off-whites work best for mimicking stone textures. Begin with a thin, even layer of paint using a high-quality brush or roller. This helps avoid any streaks or lines that might occur with thicker applications. Work in long, controlled strokes, maintaining a wet edge to prevent lap marks.
Creating an even coat is paramount. To achieve this, apply the paint in sections, ensuring each area is thoroughly covered before moving to the next. Overlapping slightly while the paint is still wet will help blend the sections seamlessly. Monitoring the paint thickness is crucial; too much paint can lead to dripping or bubbling, while too little can result in an uneven texture. Take your time to ensure that the paint is applied consistently.
Allow the first layer to dry completely before applying any subsequent layers. Drying times can vary based on the paint type and environmental conditions, but typically 24 hours is sufficient. Patience during the drying phase is essential, as rushing may lead to peeling or issues with adhesion of the additional layers.
To avoid bubbling, ensure the painted surface is free of dust and moisture, as contaminants can interfere with the paint’s adhesion. Additionally, avoid painting in extremely humid conditions or direct sunlight, as these can cause the paint to dry too quickly or not uniformly.
By carefully applying the base layer with attention to detail, you lay the groundwork for a realistic stone effect that will enhance the aesthetic appeal of your project using Mithila paints. Observing these guidelines ensures that the foundation of your stone effect is solid and impeccable.
Creating Texture: Tools and Techniques
Creating a stone effect in Mithila painting necessitates an understanding of various texturing tools and techniques that can be employed to bring out the desired texture. Using different methods such as sponging, stippling, and palette knives can significantly alter the outcome, each lending its unique characteristic to the final piece.
Sponging is one of the most commonly used techniques for adding texture. By dabbing a paint-filled sponge on the canvas, artists can create a speckled effect that mimics the look of aged stone quite effectively. The variations in pressure applied during sponging can yield different intensities of texture, allowing for a more customizable stone effect.
Stippling involves the application of small dots of paint using tools like a stippling brush or even the tip of a fine paintbrush. This technique can simulate the granular texture found in natural stone surfaces. The density and spacing of the dots can be adjusted to achieve a lighter or heavier texture, thus providing flexibility in the visual output.
Palette knives offer another distinct texturing approach. By spreading the paint with a knife, artists can create sharp, jagged lines, a feature common in some stone formations. The knife can also be used to scrape away layers of paint, revealing the underlying layers and adding to the illusion of depth and ruggedness.
Other texturing tools, such as coarse brushes or even household items like combs, can be utilized to create specific textures. Each tool provides its unique pattern and can be used in combination to build a more intricate visual texture. For instance, beginning with a base layer of sponging and adding stippled elements on top can lead to a highly detailed, stone-like finish.
Ultimately, the choice of tools and techniques depends on the desired effect and the type of stone texture one aims to replicate. Mastery of these methods can open up a plethora of possibilities, allowing for greater artistic expression within the Mithila painting tradition.
Adding Details and Enhancements
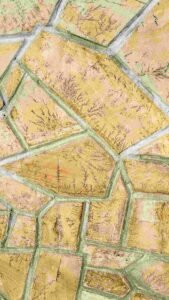
Creating a realistic stone effect with Mithila paints involves more than just a base coat. To achieve an authentic appearance, it’s essential to add fine details and enhancements that mimic the natural intricacies found in stone. By integrating veins, cracks, and layers, you can significantly elevate the stone-like quality of your painting project.
Begin by examining natural stone for reference. Notice the subtle color variations, vein patterns, and irregularities, which can serve as your guide. Using a thin brush, apply delicate lines to represent veins. Choose supplementary colors, such as muted whites, grays, and earthy tones, to create a natural look. It’s important to ensure these lines vary in size and direction, reflecting the random yet organic nature of real stone.
Once veins are in place, focus on adding cracks and indentations. A dry brushing technique works well here, allowing you to gently layer shades of a darker hue over the base color. This gives the impression of depth and imperfections common in stone. Be mindful not to overdo it; strategic placement of these details can be more effective than an overly busy surface.
For an enhanced three-dimensional appearance, blending plays a crucial role. Seamlessly blend your supplementary colors to create smooth transitions. Use a sponge or a soft brush to soften the edges of your veins and cracks, ensuring they integrate naturally with the base coat. Gentle stippling can also be employed to mimic the grainy texture of stone.
Shading and highlighting are vital for adding dimension to your stone effect. Identify the primary light source and apply lighter colors to areas where light naturally hits. Conversely, use darker shades to create shadows in recessed areas. This contrast between light and dark helps to emphasize the uneven surface of the stone, granting it a more tangible and lifelike quality.
Finishing Touches and Preservation
After successfully creating a stone effect with Mithila paints, your artwork requires essential finishing touches and preservation steps to maintain its pristine appearance. Sealing the artwork is crucial, as it protects the paint from external elements and ensures the stone effect remains vivid and lifelike. Various sealants are available, each with unique properties that suit different artistic needs.
One popular option is an acrylic spray sealant, known for its ease of application and quick drying time. Acrylic sealants provide a clear, protective layer that enhances the colors of Mithila paints without altering their natural stone look. For those looking to achieve a satin or matte finish, there are specific sealants designed to cater to these preferences, offering a subtle sheen or a more subdued appearance.
For artists who prefer a more traditional approach, varnish is an excellent choice. Available in both glossy and matte finishes, varnishes provide robust protection, making the artwork resistant to dust, moisture, and UV rays. Applying varnish with a soft brush offers greater control over the finish, ensuring an even and smooth protective layer.
Epoxy resin is another alternative, offering a high-gloss finish that can intensify the depth and texture of the stone effect. Epoxy’s durability is unparalleled, creating a hard, glass-like surface that withstands significant wear and tear. Though its application process is more involved, the results can be profoundly impressive.
Beyond the initial sealing, long-term care and maintenance are essential to preserve the beauty of your stone effect artwork. Regular dusting with a soft, dry cloth helps to prevent the build-up of grime. Avoiding direct sunlight can mitigate the risk of color fading over time, and keeping the piece in a stable, climate-controlled environment guards against potential damage from humidity and temperature fluctuations.
By carefully selecting the appropriate sealant and adhering to diligent maintenance practices, your Mithila paint creation will continue to radiate its stone-like charm for many years to come.
For anyone looking for play fun clicker fanmade extension chapter 1 foundation, this page is worth checking. It gets straight to the game without extra clutter.
fun clicker remastered remix feels like a solid browser game for quick play. It has that simple clicker rhythm that keeps you going.
If you like online clicker games, play fun clicker remastered remix is a good one to add to your list. The page is clean and quick to load.